Equipment (HQ)
The Equipment screen in HQ provides a list of all Equipment within HQ. A user has many filter options and column options to help narrow down the list of Equipment displayed. To view the details of a piece of equipment, select the 3 dots to the right and then select Details or click the Serial Number (in Green).

Equipment Details
After selecting a piece of Equipment to view the details, the Equipment Details screen displays and the following information is shown about the equipment in various cards:
TIP: The HQ user can utilize the links for Make and Model to quickly access details of the Make or Model from the Details card.
Bill To Customer: The Customer name and number.
Branch: If your dealership has multiple locations, the Branch that services the unit can selected.
Location: The [ship to] location and number.
Serial Number: The equipment's assigned serial number.
Internal Unit Number: Dealership's tracking number.
Make: The equipment's assigned make [manufacturer].
Model: The Equipment's assigned model number.
Model Type: If integrated and your business supports model types, this field will be automatically populated through the nightly equipment job. Assigning a model type to equipment will automatically link the appropriate checklist, provided the model type has one. Using model types eliminates the need to manually assign a checklist to each piece of equipment in HQ.
Equipment category: If integrated and your business supports equipment categories, this field will be automatically populated within the Model Type through the nightly equipment job.
Year: If integrated and your business supports equipment Year, this field will be automatically populated through the nightly equipment job.
Last Maintenance Date: This date is automatically populated when a maintenance work order is completed for the asset. Tip: In the Equipment list, use 'Manage Columns' to add 'Last Maintenance Date' column to the table, then sort by descending order to quickly identify equipment with the oldest maintenance dates.
Company Owned: Marking your equipment as company-owned provides for clear distinction between company-owned and customer-owned assets, making it easier to track and manage your internal equipment inventory. When assets are marked as company-owned in HQ, a green tag will appear next to those equipment in the technician's Service app. Click here to learn more. NOTE: If integrated, and if your business system supports identifying company owned assets, this field will be automatically populated during the nightly equipment update.
Meter: The meter field is the last known hour meter that was entered by a technician within the Service app. Or, if someone in HQ updates the hour meter via the work order details screen.
Meter Date: The meter date field is the last known date that the hour meter was entered by a technician within the Service app. Or, if someone in HQ updates the hour meter via the work order details screen.
Active warranty: Enable this if the equipment has an active warranty. It’s important to inform your technicians when equipment is still under warranty. However, it’s crucial that they also understand that being under warranty doesn’t automatically mean the specific repairs they’re performing are covered by it. NOTE: If integrated, and if your business system supports identifying equipment with active warranties, this field will be automatically populated during the nightly equipment update.
QR Code: Only applicable if your dealership purchased Tinnacity's QR feature and the equipment has an active assigned QR Code. Using QR codes for asset management offers several key benefits: Instant Access to Asset Information: Scanning a QR code provides immediate access to detailed asset information, including specifications, service history, and maintenance schedules. Simplified Service Requests: Technicians or staff can quickly submit service requests directly from the QR code, reducing the time and effort spent locating the asset and manually entering data. Real-Time Updates: QR codes allow users to view open work orders and track ongoing service, ensuring they stay up-to-date on the asset’s current status. Improved Accuracy: By linking directly to an asset’s data, QR codes minimize errors associated with manual entry, leading to more accurate records and reporting. Increased Efficiency: QR codes streamline the asset management process by enabling quick scans for inventory checks, maintenance tracking, and service requests, saving time for technicians and administrators alike.
Last QR Scan: Only applicable if your dealership purchased Tinnacity's QR feature and the equipment has an active QR code assigned. The date and timestamp when the QR was last scanned and the person who scanned it is displayed.
Active: If set to 'NO', you can view the equipment details, but you cannot create work orders for it. If the equipment is set to NO, a red banner will display at the top of the details screen. IMPORTANT: If the equipment status is set to 'Inactive' in HQ, technicians will not be able to request or create a work order for that serial number. A prompt will display: 'This equipment is not active in the system. Please contact the office for further assistance.'
Sync with Business System: If your dealership is integrated with Tinnacity and you do not manage the relevant equipment in your business system, set this to NO. This will prevent the equipment from being deleted during the nightly equipment sync.
Equipment Operational: Equipment downtime can be monitored in HQ and managed by both back-office staff and technicians by setting the equipment status to operational or non-operational. Monitoring and quick restoration of equipment operation enhances reliability, leading to improved customer satisfaction. For service-oriented businesses, maintaining operational equipment is crucial for meeting service level agreements (SLAs) and ensuring timely delivery of services. When a piece of equipment becomes non-operational, an HQ user or a technician can designate a piece of equipment as non-operational. This provides visibility to both Back-Office personnel and Technicians. This can be done within HQ or the Service app. Click here to learn more.

Specifications
Specifications for the equipment can be added here and also viewed by the technician in the Service app. Power Type, Capacity, Weight, Lift Height, Collapsed Height, Attachment, For Length & Mast. NOTE: There are several power types available to choose from in the dropdown menu.

Related Equipment
If the unit has specific attachments (e.g., box clamp) and those are tracked within Admin>Equipment, you can associate those attachments to the unit on display. To associate a related equipment, go to Admin>Equipment, locate the related equipment's serial number and assign the 'Parent Equipment'.
Notes Card
Equipment notes specific to the unit for future service and parts requirements (e.g., This unit is typically used in the Shipping area). NOTE: These notes are viewable in the Service app and the technician can modify them.
Attachments
Attachments (PDF, jpeg, and png) for the Equipment, such as wiring schematics, data plate, etc. and URL links (can only be added by HQ users) can be added in HQ and Service app.
Model Attachments
Attachments for the Model associated with the Equipment, such as PDFs and images as well as URL links can be added via HQ and viewed by the technician in the app. NOTE: Technicians can NOT add any attachments to Models within the Service app. Click here to learn more on how to add Model attachments in HQ.
Equipment Maintenance Programs
If the unit is assigned to a PM Program in Tinnacity, the assigned Equipment PM Program(s) will be displayed. Click the three-dots to go to the program's details.
Open Work Orders
A list of all open work orders for this piece of equipment. View and access the work order details by clicking the work order number highlighted in green or the three-dots>Details to go to the work order details. TIP: Use the 'download' icon to export to a .csv file.
Service History Card
A list of all completed work orders for this piece of equipment. View and access the work order details by clicking the work order number highlighted in green or the three-dots>Details to go to the work order details. TIP: Use the 'download' icon to export to a .csv file.
Hour Meter History
Shows the Hour Meter date, meter entry, and source.
Quotes
A list of all submitted quote requests for this piece of equipment. View and access the quote details by clicking the three-dots>Details to go to the quote details. TIP: Use the 'download' icon to export to a .csv file.
Equipment Non-Operational Card
Allows an HQ user to mark a piece of equipment as non-operational and this will also show in the Service app on any Work Orders this piece of equipment may be assigned to. Click here to learn more on how to change the operational status of a piece of equipment. A list of each time the unit was marked as not operational and back up, track downtime for this piece of equipment. TIP: Use the 'download' icon to export to a .csv file.
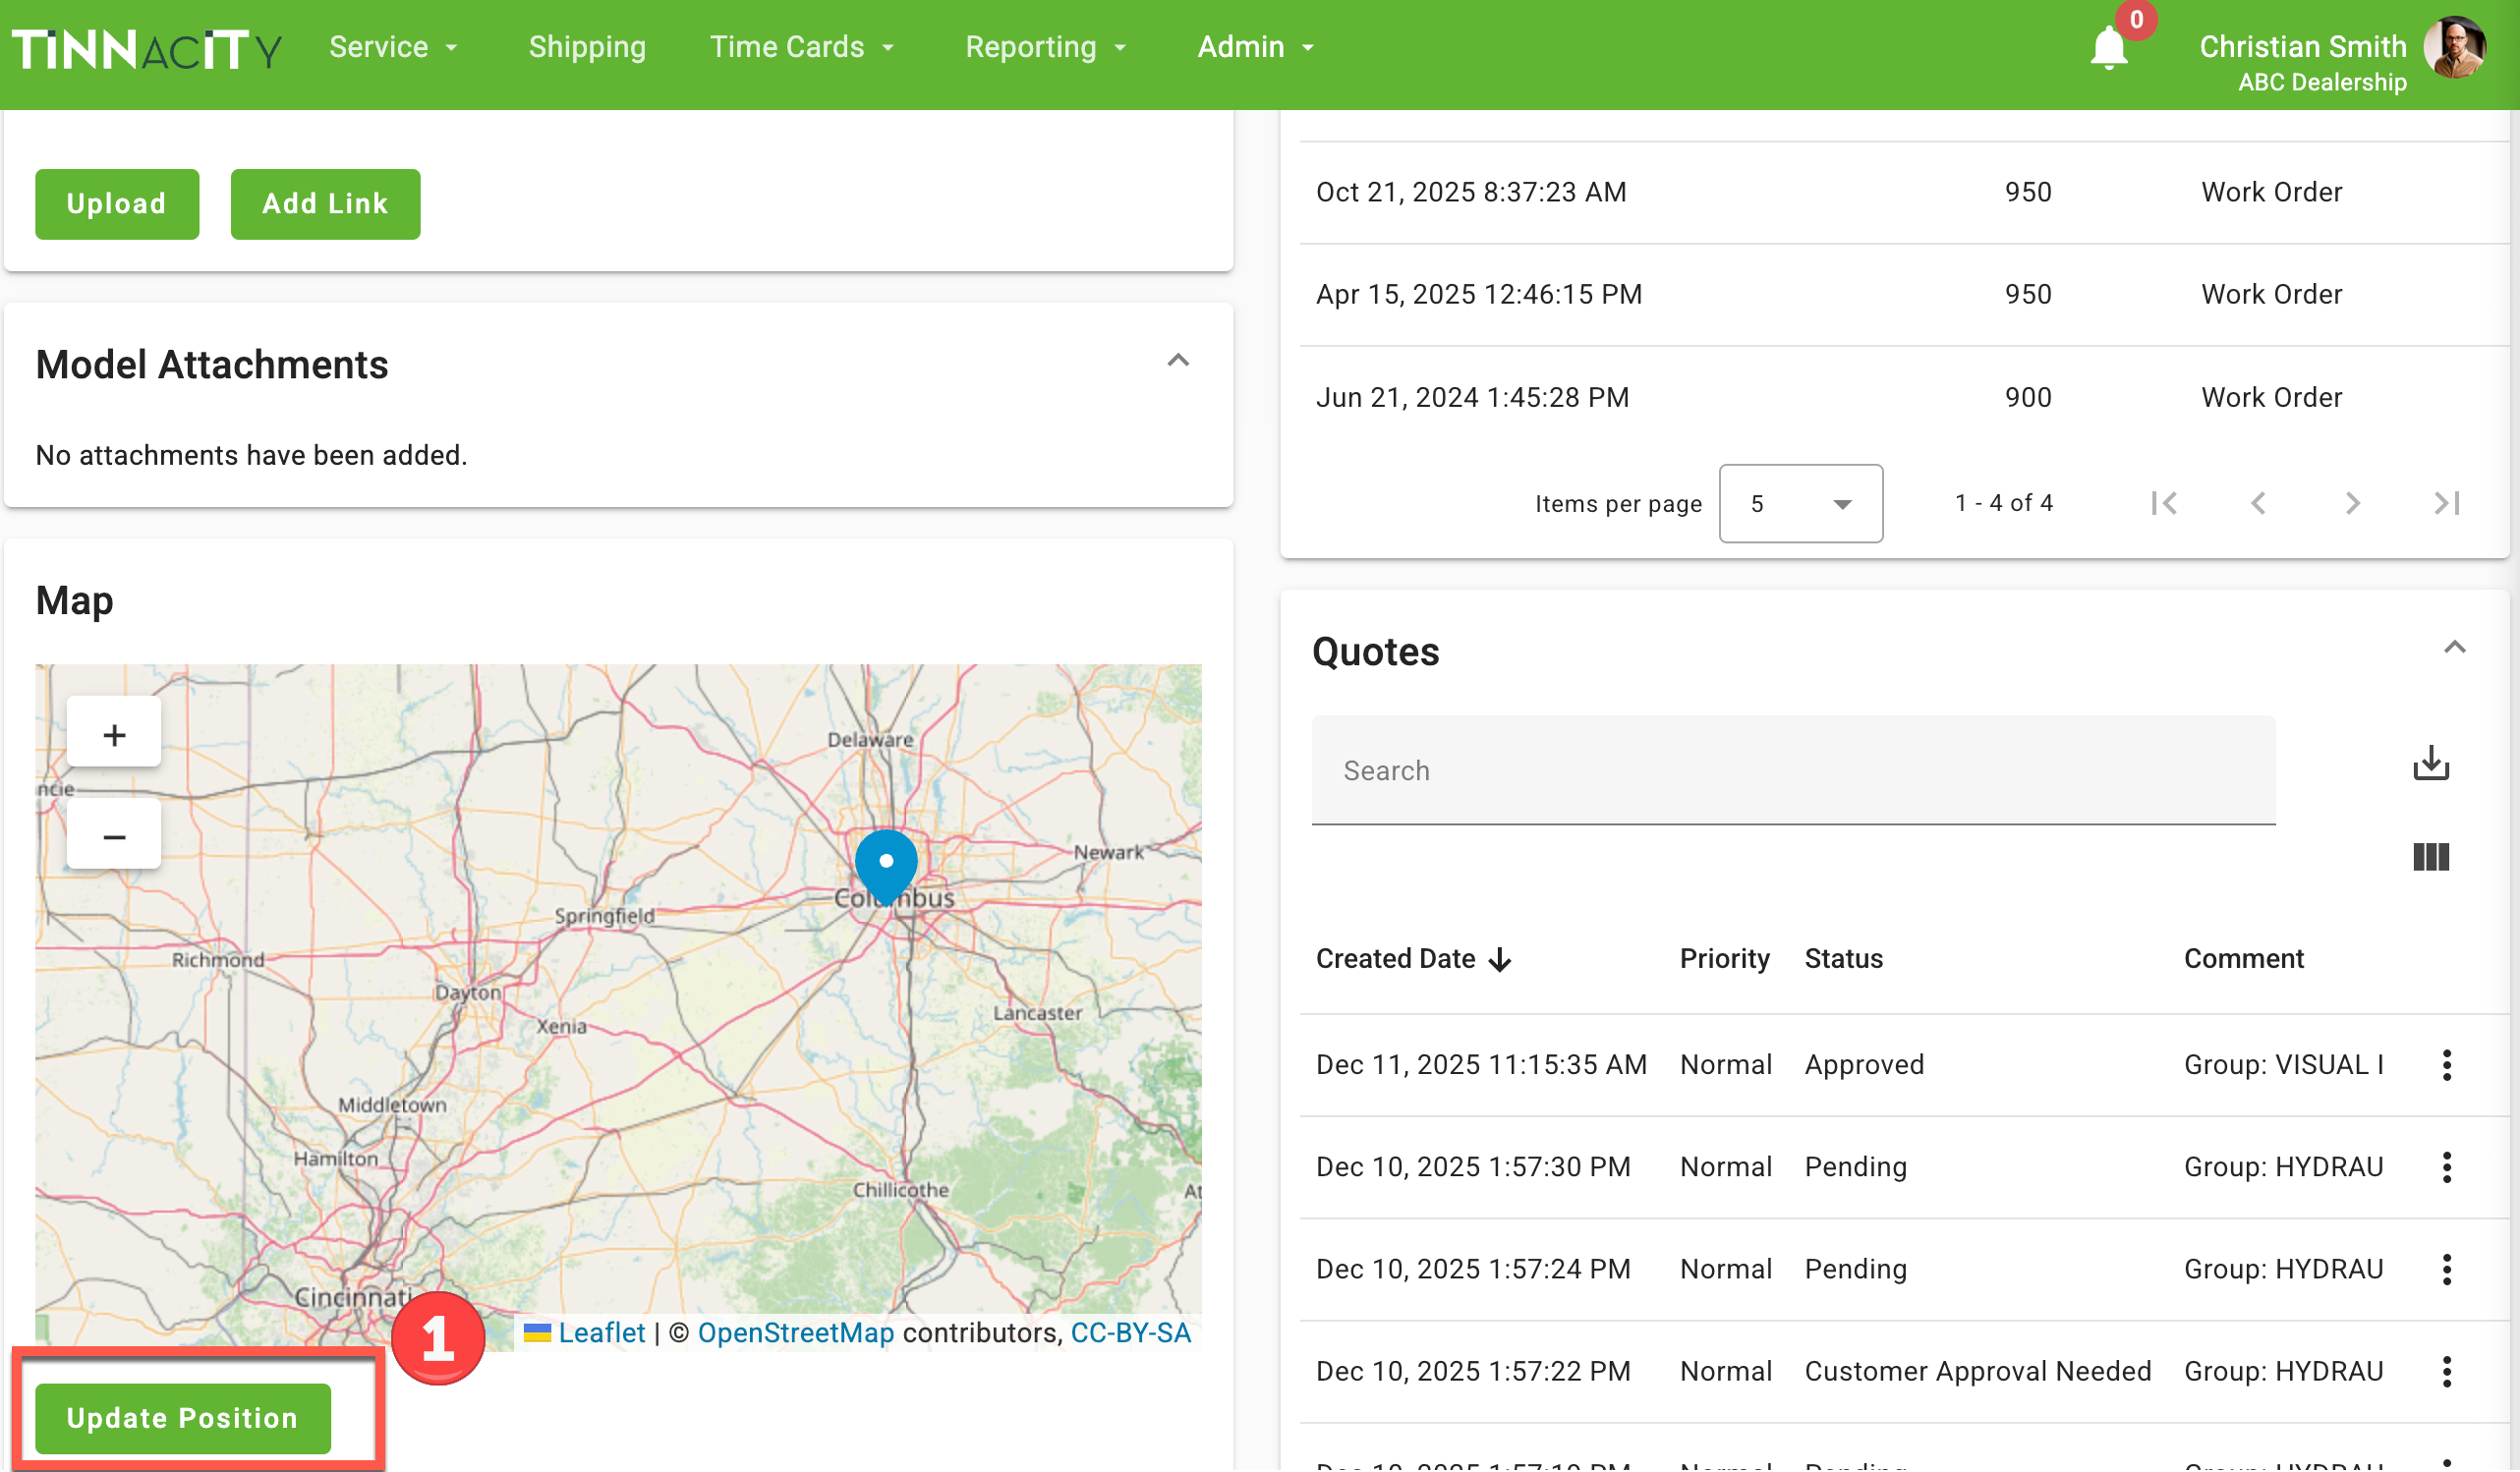
Map: Updating Equipment Position (Actual location)
Within the Map card, an HQ user can manually update the position of the equipment by entering Latitude and Longitude coordinates & if manually updated in HQ the technician can get map app directions to the physical location within the work order details screen in the Service app. NOTE: Currently technicians cannot add the latitude/longitude coordinates within the Service app.
This can be helpful if equipment is not at a Customer's business site, but perhaps is physically located elsewhere. I.e: Construction equipment being used on a highway project. Additionally, by default the Location Address in the work order details screen in the Service app is the Ship To address within your business system. So in cases where the equipment is not physically at the Ship To location, the hyperlink to use the map app for directions to the Ship To address may not be where the technician actually needs to go. NOTE: Tinnacity currently does NOT integrate with any GPS installed software on equipment.
Follow the steps below to update equipment position:
- Within the Equipment Details card, scroll to the bottom and in the Map card, select "Update Position"
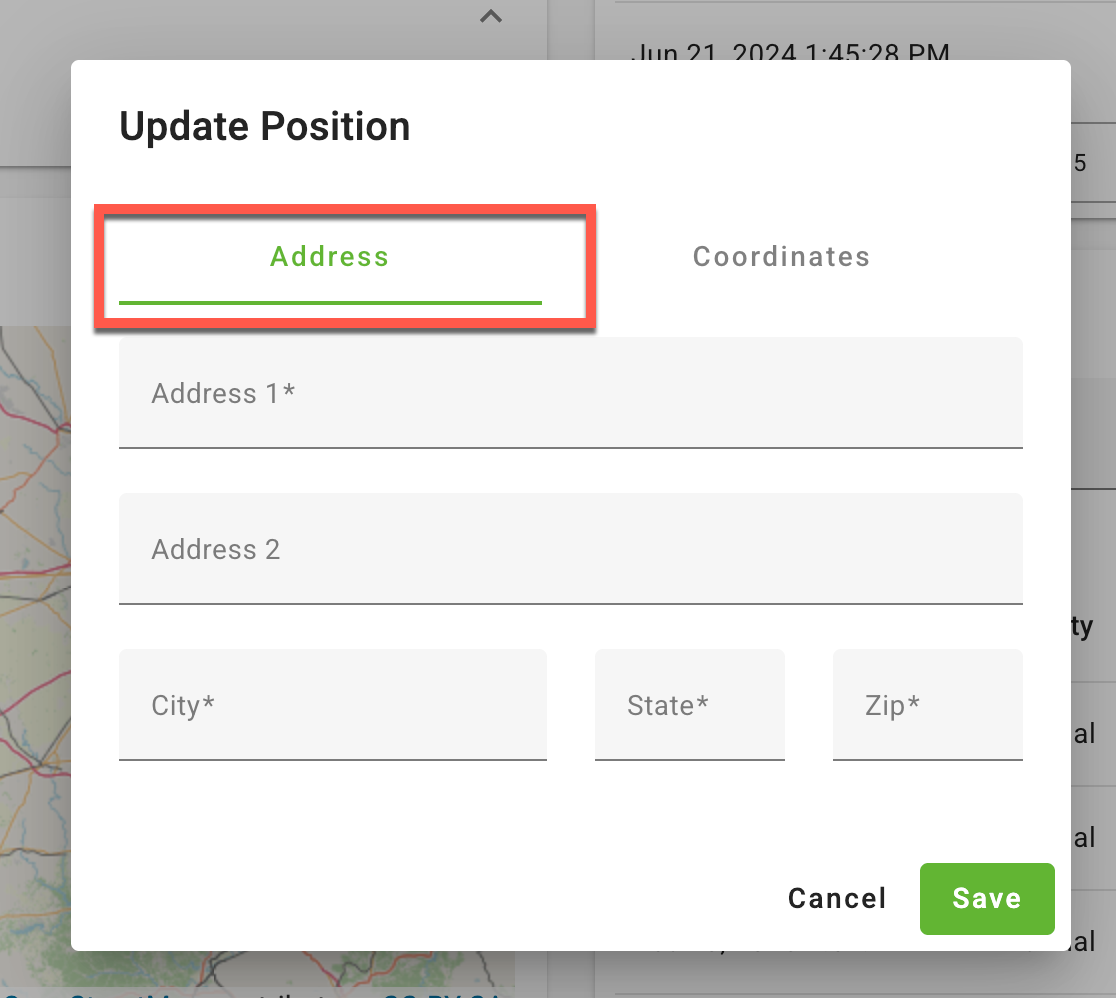
- Next 2 options are available:
- Address-where you can enter an address other than the default Ship To address on the work order
- Coordinates-where you can enter Latitude & Longitude coordinates
- TIP: If the equipment is equipped with GPS Software, enter the coordinates found there into HQ. If GPS software is not equipped, you can utilize Google Maps, pin the location and then copy the coordinates to enter in HQ.
- You can enter the address information or the Coordinates information. Just make sure at least one is entered and select Save

- Within the Work Order Details screen of the Service App, the technician will see the Location Icon at the top of the Equipment Card
- Once they press the Location Icon, they will then be routed to their device's Map app where they can then get directions to the equipment's location
