Work Order Details-HQ
Within HQ>Service>Dispatch, there are 2 ways to view the Dispatch screen which can be selected by clicking on the Table icon in the top right or the Cards icon, depending which view you prefer.
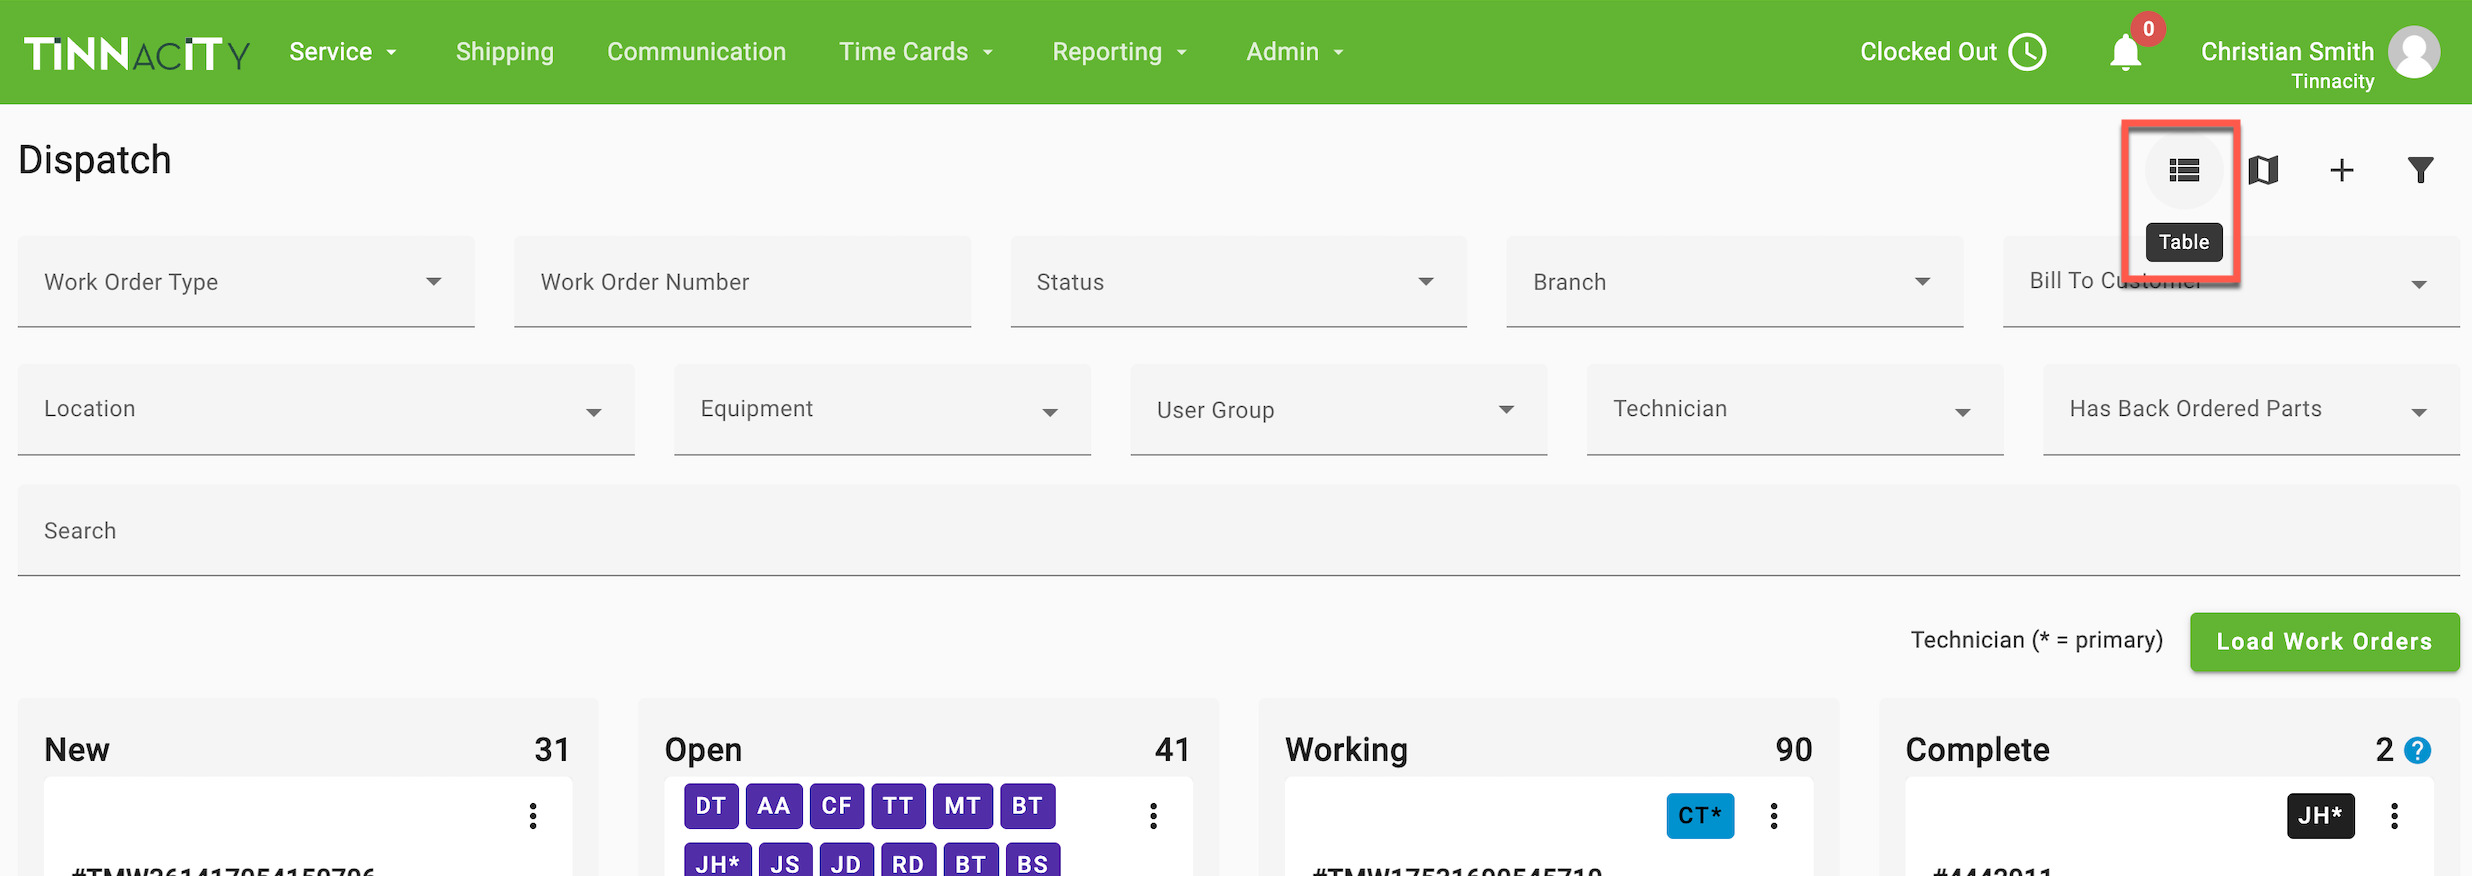
Dispatch Board (Card View)
- Details can be viewed by selecting the 3 dot-menu and choosing "Details"
- -OR- Simply click the card on the dispatch board to view the details

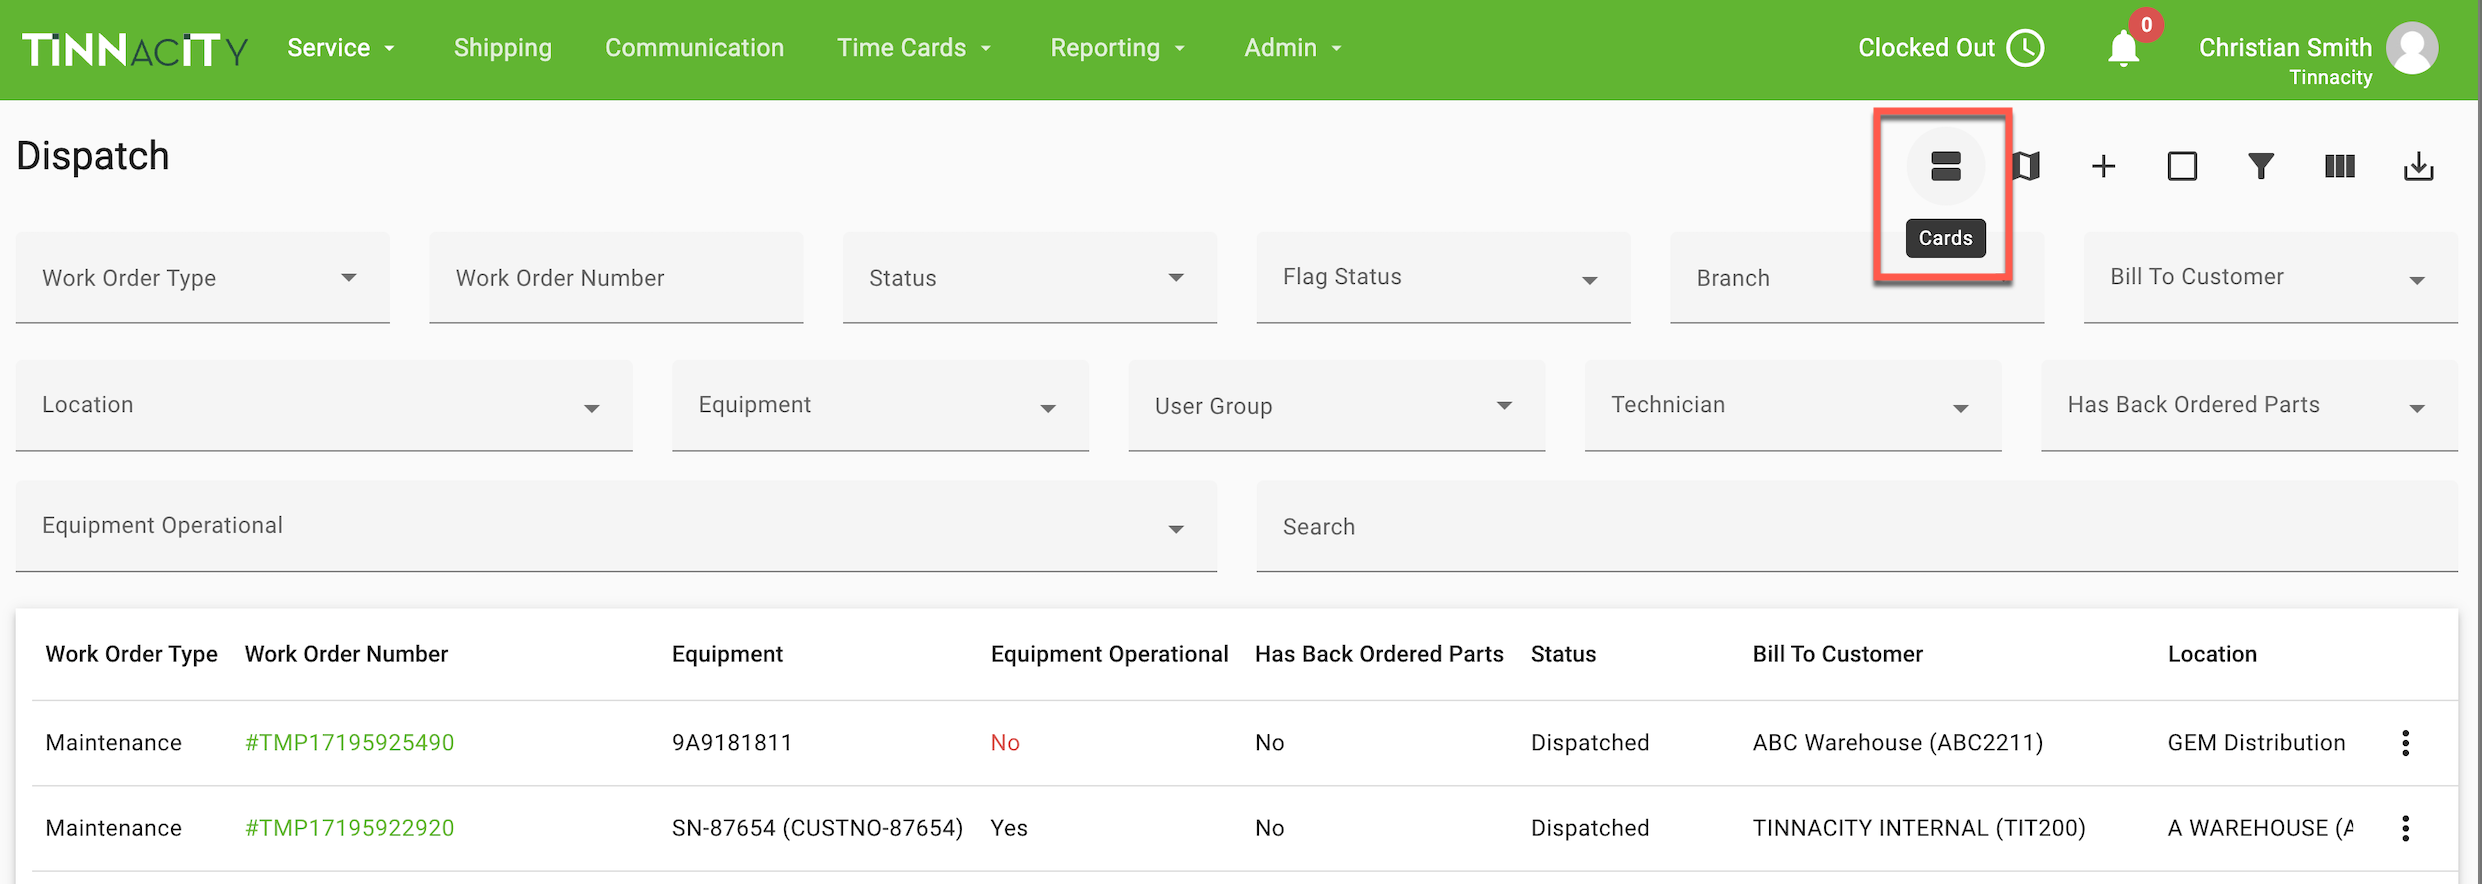
Dispatch Board (Table View)
- Details can be viewed by selecting the 3 dot-menu and choosing "Details"
- -OR- Simply click on the work order number

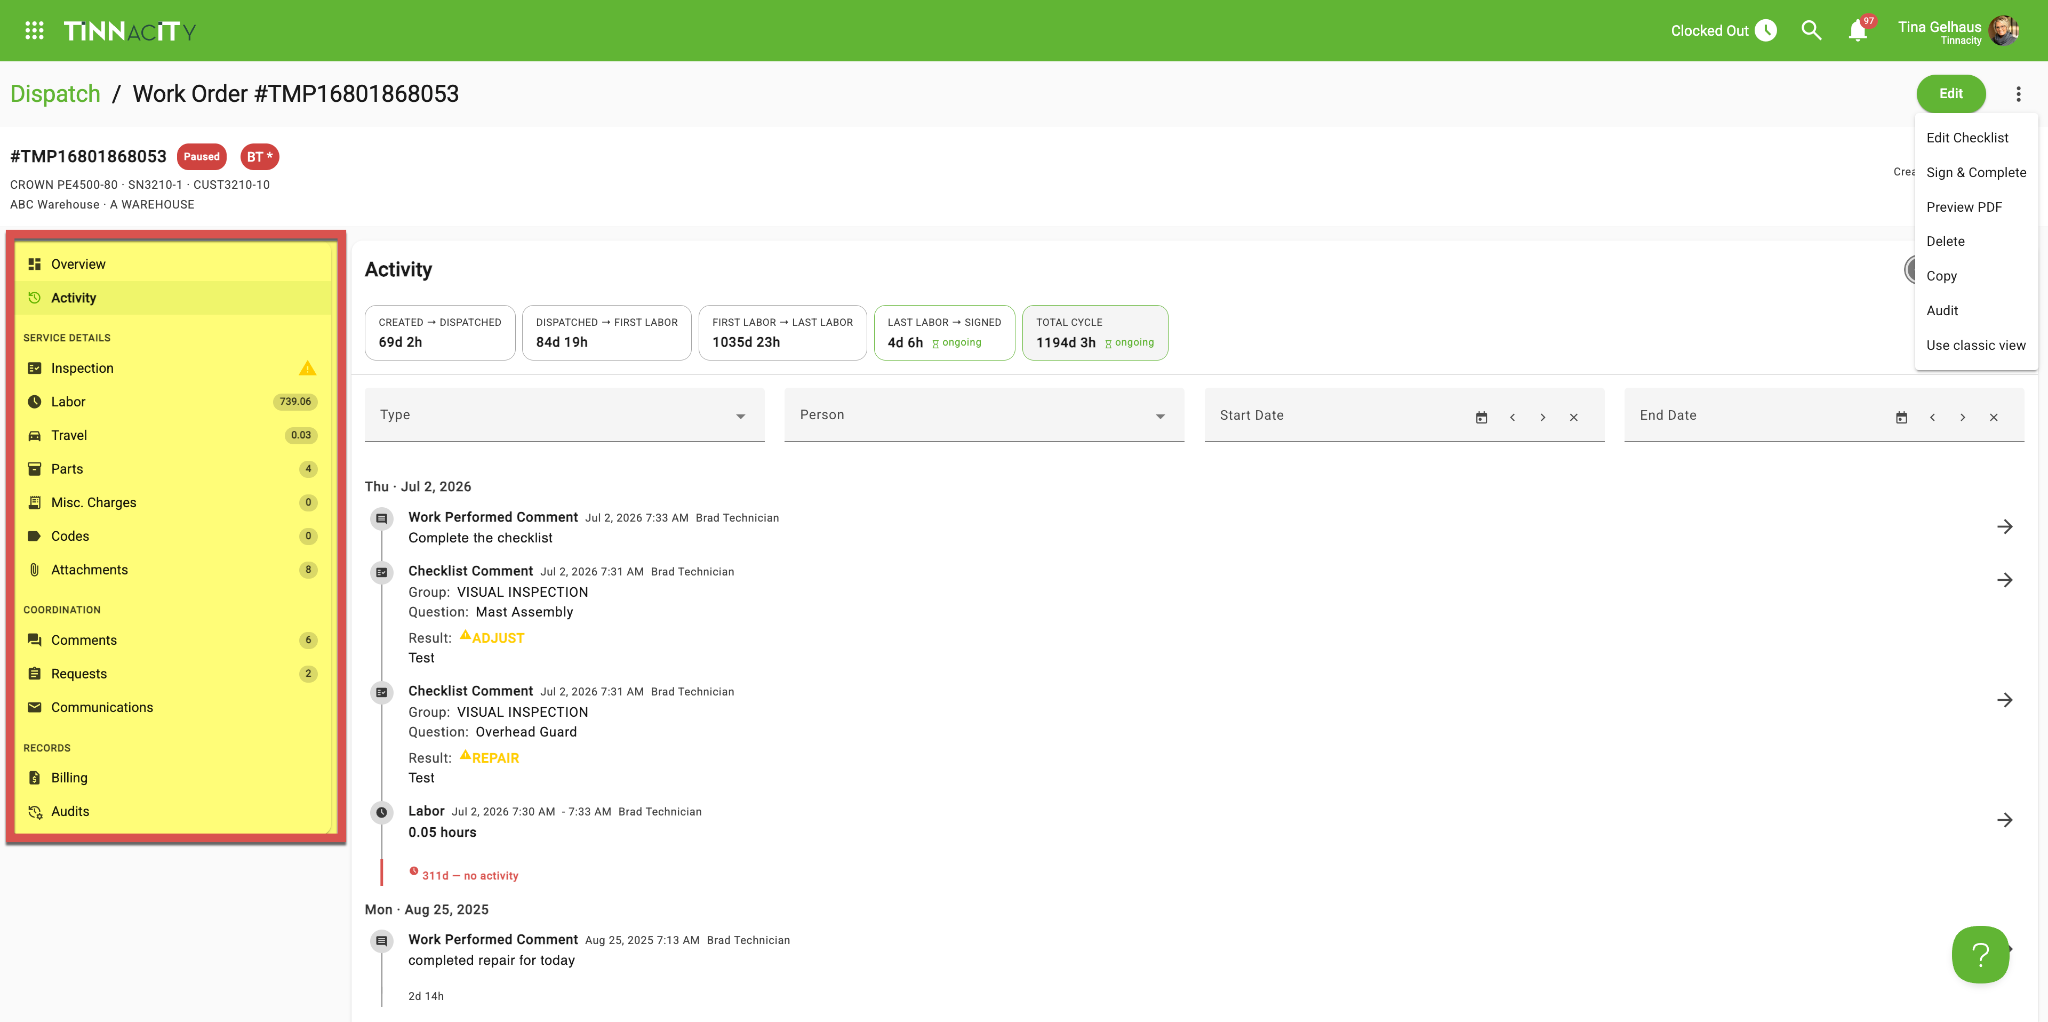
Work Order Details Screen (New View)
Starting July 13, the tabs at the bottom are going away. In their place, you'll see a new left-hand panel with clickable view names. We've also broken things out into more detail so it's easier to find exactly what you need:
- Inspection — if applicable
- Labor
- Travel
- Parts
- Misc. Charges — if enabled
- Codes
- Attachments
- Comments
- Requests — any technician or back-office requests submitted for the work order
- Communication — SMS, if applicable
- Billing
- Audits
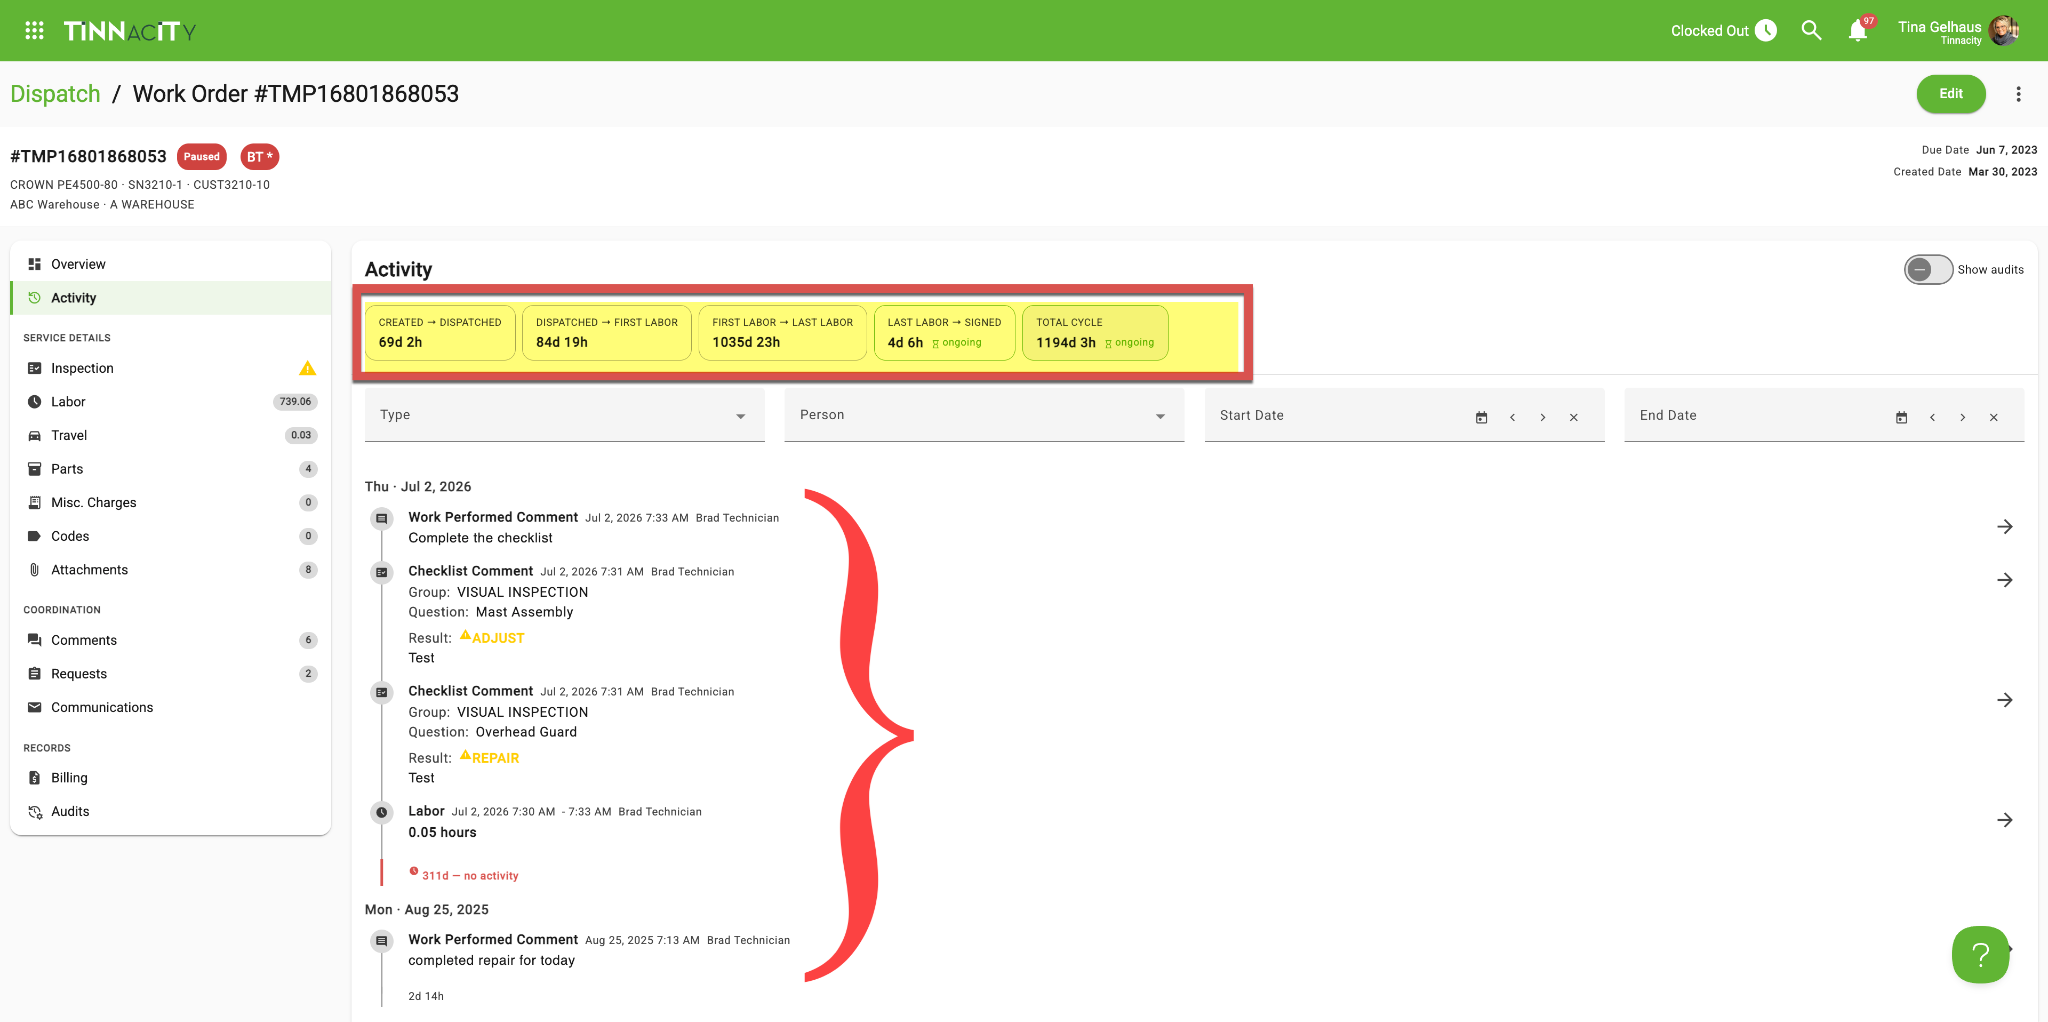
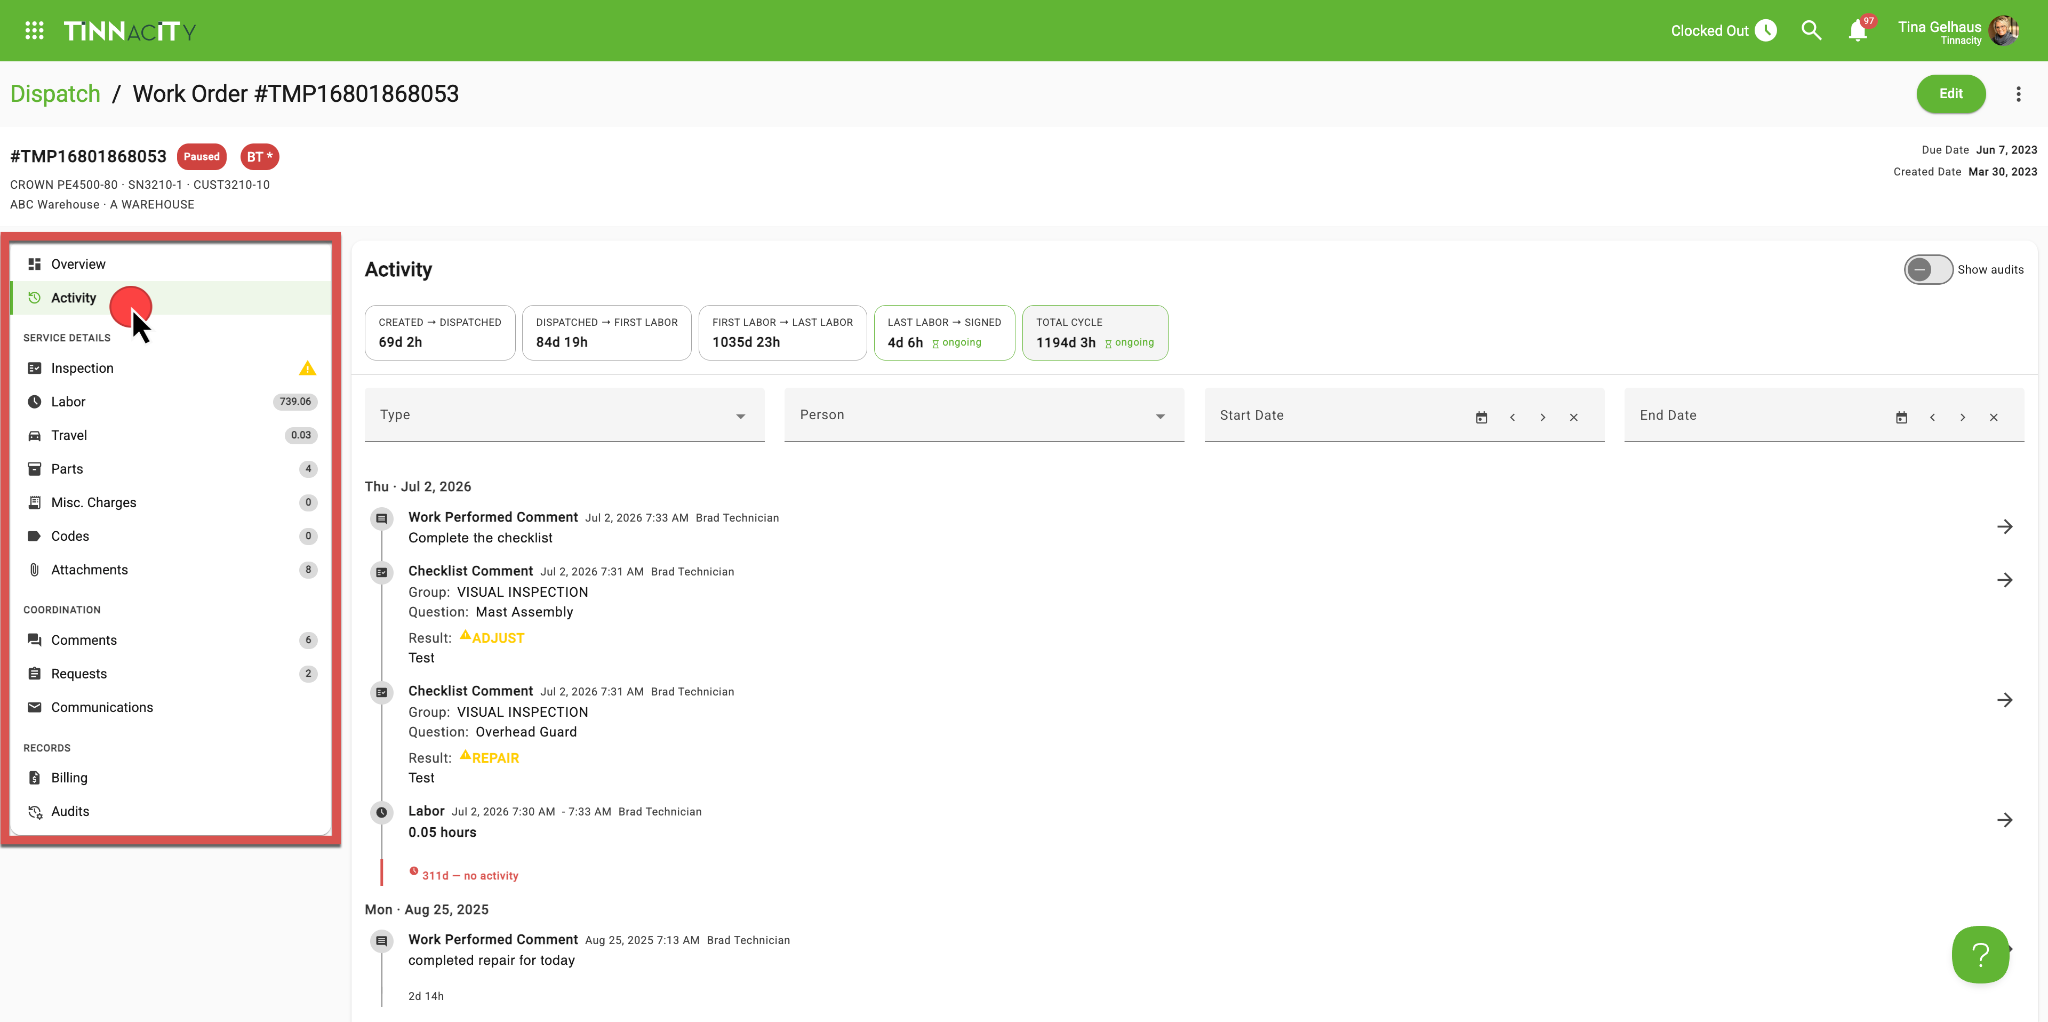
- Activity — a timeline of key events
The Activity view shows a full timeline for the work order: when it was created, when travel was applied, when labor was applied, when work-performed notes were added, and when the work order was completed. As well as the number of days and hours for:
- Created to Dispatch
- Dispatched to First Labor
- First Labor to Last Labor
- Last Labor to Signed
- Total Cycle Count
How to find it
- Navigate to Service > Dispatch or Service History.
- Click a work order number to open its details.
-
Use the new left panel to jump between views — no more scrolling through bottom tabs.

Work Order Details Screen (Classic View)
The work order details are broken down into sections via various detail cards.

Work Order Detail Cards:
- Location - Displays the Bill To (customer) & Ship To (location) information on the work order. Contact information will also show if provided.
- Equipment - Displays the associated Serial No, Customer Unit No, Internal Unit No, Make, Model and Meter (if applicable). If the work order has a checklist, the user can see the checklist by name and view details and pictures (if applicable) by clicking on the View button. IMPORTANT: Images are not visible to the customer, if needed you are required to download and email separately. If there are dates/times entered for Equipment In/Out, this will also show. Click here to learn more about Equipment In/Out.
- Status - Displays information surrounding the current status and general information gathered with the work order. These include:
- Original WO number, if applicable (typically a TM + number if created by a technician or TMW + number via HQ)
- Created Date
- Work Order Type
- Where Serviced (Shop/Field/Other)
- Status (New, Open, Traveling, Working, Paused, Technician or Customer Review, Paperwork Complete)
- Related Work Orders - will display the number of segments for the work order (must be supported by business system)
- Synchronization - This should only be changed to enable synchronization of administrative travel and/or labor hours
- Due Date (can modify or add)
- Schedule Date. Click here to learn more on Scheduling
- Priority
- Estimated Completion Date (can be set by HQ or technicians)
- Arrival Date/Time - when the technician first starts working on the work order (i.e. the work order changes to status of In Progress)
- Start of First Labor
- End of Last Labor
- Once a work order is complete, the following will display in the Status Card:
- Sign Name, Email & Date
- Sent Paperwork - who received a copy of the completed work order. NOTE: Once a work order is complete, HQ users can still send the completed PDF with the work order details if needed by selecting the 3 dots in the top right of the work order details screen and selecting Email
- Paperwork Date
- Collect Date - if integrated to back office business system, the date in which the completed information was collected.
- Travel Back Used - The time applied to Back End Travel (after the work was completed & if enabled in HQ>Company Settings>Service Settings)
- First-Time Fix (Yes/No) (can be updated by HQ)
- Customer Damage (can be updated by HQ)
- Flag Status - Work orders can be flagged with different colored flags that will display here and in the History page. These flags do not have any built-in functionality and are for viewing purposes only.
- Technician(s) - All technicians assigned to the work order
- Billing- Quoted Hours,PO Number, Payment Terms, Payment Link and the Invoice Number. Click here to learn more about Payment Terms.
- Description-Displays the problem reported or reason for the work order
- Labels- Labels can be applied by technicians and by HQ users. These Labels can be created and managed in HQ>Admin>Labels only. Labels are used to help identify different characteristics about a work order. Click here to learn more.
Work Order Details Tabs (bottom of details screen):
At the bottom of a Work Order details screen, an HQ user can further view, manage & add/remove information corresponding with the Tab selected. TIP: In the top left of each tab click on the Add button to add entries relating to the Tab you are in.

-
Labor and Travel - The Labor and Travel tabs reflect the hours billed to the customer, calculated based on the specific rate settings, minimums, maximums, and rounding rules of the Work Order Type. NOTE: Minimums are applied per technician, per day.
Conversely, the Activity tab tracks actual time spent. While Work Order billing may differ due to rounding rules, the hours listed in the Activity tab should always align exactly with the technician's Timecard entries.
NOTE: On the Activity tab, if the labor, travel, or comment was transferred from another work order, it will display the work order number it was transferred from. For technician transfers, requires v2.75.0 or higher.
-
Parts - The Parts tab added to work orders display within the tab. Users can add, edit, and delete parts. TIP: For customers not integrated with Tinnacity, to add a part as being 'back-ordered', enter '0' for Quantity and '#' for Back Order Quantity.
- Attachments- The Attachments tab consolidates all pictures, PDFs, and related files uploaded by technicians and back-office staff, including photos captured via the checklist. Users have control to tag (rename), view, download, transfer, or delete any attachment. Please note the maximum file size limit is 5MB.
|
|
Rename attachment |
|
|
Make customer visible |
|
|
Preview attachment |
|
|
Download attachment |
|
|
Transfer attachment to a different work order |
|
|
Delete attachment |
| Attachment Types |
|
|
|
|
|
|
Up to 15 second video |
|
|
Still image |


- Codes- If applicable, any Cause/Correction codes will be displayed here. Click here to learn more.
-
Activity - The Activity card displays everything that has happened on the work order. When a technician adds labor/travel, adds a work performed comment, private comment (click here to learn more), or submits any requests, it will display in the Activity tab.
NOTE: When labor, travel, work notes, and attachments are transferred from one work order to another, the receiving work order will display the originating work order number from which the data was transferred.
- NOTE: If a labor or travel entry is received on a later day into HQ (i.e. technician was offline) from when it was created, a note in will be shown below the entry. This will indicate the date and time in which the data was actually received.

- NOTE: If a labor or travel entry is modified after it has been received by HQ (i.e. technician or office staff), a note in will be shown below the entry. This will indicate the date and time in which the data was modified, by whom, and the original value.

- Within the Activity tab an HQ user can manually add Comments (Private or Work Performed), edit/add labor and/or travel entries, create a quote request, create a part request and assign requests to yourself or other HQ users.
- AI REWRITE: For Work Performed Comments that have already been added to a Work Order, HQ Users can use the AI Rewrite feature to assist in cleaning up any comments previously added via HQ or to rewrite any comments that a Technician had previously entered via the Service app. NOTE: AI Rewrite is only available on Work Performed Comments, not Private Comments.
- Click on the Activity tab.
- Click the Edit icon.
- Click the Rewrite button.
- There are two options to choose from -
- Ignore: To disregard the suggested changes and keep the original comment or
- Accept: To update the comment to AI's rewritten suggestion.
- Click the Save button.


Three Dots Menu
Edit Checklist
To edit the current assigned checklist or to assign a checklist to a work order use Edit Checklist.
Sign & Complete
There are times when technicians are not able to get the customer's signature or maybe it is a 'third party' work order. You can use the Sign & Complete option to complete the work order. All work order type setting requirements (hour meter, work performed notes, and checklist [if applicable]) must be completed before you can sign and complete the work order.
Preview PDF
The Preview PDF feature allows you to preview the completed work order PDF before the job has been completed.
Delete
The Delete feature allows you to delete the work order.
Audits
The Audit feature provides a trail of modifications made to your work orders within Tinnacity. For instance, if an administrative work order is marked "Completed," you can use this tool to identify exactly which user performed the action. Click here to learn more.