Work Orders Details-Service app
The work orders are divided up into cards and are set up very similarly to HQ. Each card pertains to a specific part of the work order.
Customer/Location Notes
When first opening a work order, the Customer/Location Notes (if applicable) will automatically display to the technician. Once these have been viewed by the technician, the customer/location notes will not automatically display to the technician. TIP: To view the Customer/Location notes, press the [Notes] button. NOTE: Tinnacity Service v2.68.0, in the Location Card Tinnacity chose to change the color of the [Notes] button to blue instead of red, as blue better represents 'information' rather than red, which typically indicates an error or warning.

Which action Prompt?
Once the technician opens the work orders, acknowledges the Customer/Location Notes (if applicable), they will be prompted "Which action?" View, Work, or Travel. This is part of the series of prompts to help the technician move through the stages of the work order. If the technician selects view, unless they are clocking labor or travel on another work order, they will be put into 'Standby' (non-billable time). Simply tell the app what you are doing, are you traveling or working. For training purposes, TRAVEL was selected in this instance.

In the Status card, you can see Status reads 'Traveling', travel time is now being accumulated to the active work order. To begin tracking labor, press [Play].

Work Order Requirements
Depending on the work order type settings in HQ, there may be a maximum of four required actions, indicated in yellow (or orange if light theme), that the technician must complete before they can complete the work order. NOTE: These requirement are configured based on the Work Order Type, which can be set in HQ>Admin/Work Order Types>select the type and click Edit. They are:
A. Checklist
B. Hour Meter
C. Work Performed Notes (three dots)
D. Attachments

Location Card
If the (A) location address is underlined, tapping the address opens Google Maps (or the default map) with directions. If the (B) [Notes] button is blue, specific information regarding the customer and/or location that the technician needs to be made aware of are available. The (C) pencil icon indicates that this field is editable by the technician. Click here to learn more about Customer and Location Notes.

The [View Details] allows the technician to view details of the location, to view all open work orders for this location with the ability to request assignment of work order(s). As well as to request/create a work order (depending on their level permissions), to request a quote, and to submit a sales lead. Click here to learn more on viewing and requesting open work orders.

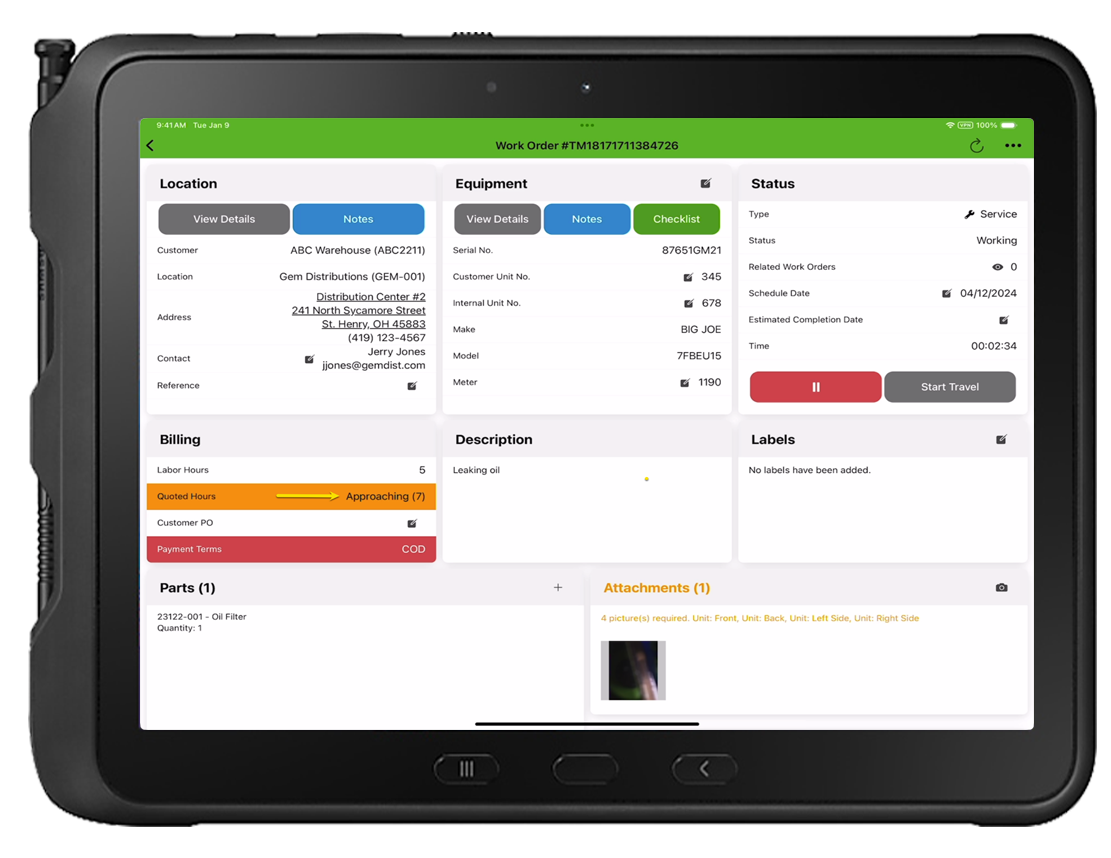
Equipment Card
The equipment card displays the equipment's serial number, customer unit number, internal unit number, make, model and hour meter. When applicable, the hour meter may be required. NOTE: The pencil & paper icon indicates that field is editable by the technician.
(A) The [View Details] button displays the notes as well as additional information such as equipment specification, attachments, allows the technician to view open work orders and request assignment, view work order history, request a work order, request a quote, and more. Attachments including .png/jpeg, and PDF documents can be uploaded by both the back-office and technicians. URL links can only be uploaded by the back-office in Admin>Equipment>Equipment Details.
(B) If [Notes] is in blue, this indicates there is important information that the technician needs to be made aware of. Press [Notes] to view these notes. TIP: Equipment notes can be added by pressing either the [View Details] or [Notes] buttons in the Equipment card.
(C) Checklist, depending the configured Company Settings, when answering questions with a response other than [OK], the technician may be required to provide a comment as to why the question was not answered okay. The checklist button will remain yellow until all questions and required comments have been answered. Press [Checklist] to begin. NOTE: Technicians can attach a photo to each checklist question, which is useful for questions marked as other than 'OK'. Images remain hidden from customers, but if needed, they can be accessed and shared by the back-office through HQ Work Order Details screen under checklist.
(D) A green tag next to the serial number represents that the equipment is owned by your dealership. NOTE: It is marked as 'Company Owned' in HQ Admin>Equipment>Equipment Details.
(E) Meter, tap the pencil icon to enter the hour meter of the unit. If no hour meter, press N/A. TIP: If the hour meter field needs to be a lower value, toggle the 'Replace Meter' switch.
(F) Update Equipment, tap the pencil icon next the 'Equipment' to mark the unit as operational or not operational or to change the assigned equipment. NOTE: Equipment cannot be changed for work orders with a type 'Maintenance' - technician must contact the back-office to change.
Click here to learn more about viewing and requesting open work orders.
Click here to learn more about equipment notes and attachments/URL links.

Equipment Card Location Icon
There may be times when the equipment's actual location is different than what shows in the Address (Ship To) within the Location card. HQ users can manually update the actual location of equipment and the technician can then select the Location Icon found in the top right of the Equipment card. Selecting this icon will then redirect them to their device's Map app and provide directions.
- Click here to learn more on how to update the position of Equipment via HQ.

Status Card
The status card displays what type of work order (i.e., Service, Maintenance, Warranty, etc.), the Status the work order is currently in (i.e. Traveling, Working, Paused, etc.), Due Date (if set), Schedule Date (if set), Priority (if set) and Estimated Completion Date (back office and technicians can modify this date), and the current allotted time towards the selected action. Click here to learn how to sort open work orders by priority, schedule date, etc.

Description Card
The description card displays the work order description.

Labels Card
The labels card allows the technician to add labels to help better describe the cause of the repair (i.e. damage, operator error, abuse, etc.). Labels can only be created in HQ. Based on HQ Company Settings, these may also be allowed or not allowed to show on the work order complete pdf.

Parts Card
The parts card allows the technician to add parts used (pulled from their van or purchased parts) or to request a part. To add a part(s), click the + sign.
Click here to learn more about adding parts. Click here to learn about requesting a part.

Attachments Card
The attachment card allows the technician to add pictures that are relevant to the work order. Press the Camera icon to take a photo. Click here to learn more about work order attachments.
NOTE: If in HQ>Company Settings>Technician Capabilities the feature 'Add photos from the photo library' is disabled, technicians will not be able to access their photo library via the Service app and will be required to take each picture.
Click here to learn more.

NOTE: When in HQ Admin>Work Order Types>Work Order Type Details screen, there is an Attachments card where Mandatory Picture Requirements can be set. When the technician begins to attach attachments they must select what type of attachment they want to add. This will include a button for each set mandatory picture requirements, general, and a private attachment. Click here to learn more.
Designation types of Attachments:
- Private: This picture will not be visible during the Customer Review process, nor will it be included in the completed work order PDF document.
- General: This picture will not be labeled and will be included in the Customer Review process and will be included in the completed PDF document.

Technicians can add either a photo or video recording. Once added, the Attachments Card will show all attachments and if it is a:
- Video: there will be a Play Button Icon imposed on it, signifying the attachment is a video recording
- Photo: there will be an Mountain Scene Icon imposed on it, signifying the attachment is a photo.

TIP: To remove an attachment, tap on the relevant attachment, and then use the trashcan icon to delete it. To preview the pictures, tap on one of the attachments, and then use the [Previous] and/or [Next] buttons to navigate through the pictures.
Billing Card
The Billing Card has several optional features that can be enabled via Company Settings and/or at the Customer Level.
Quoted Hours
If the work order has quoted hours configured, this will display in the Quoted Hours field.
If in Company Settings>Service Settings>Technician Capabilities either of these options are enabled, the billing card will display:
- Show Technician Quoted Hours on Work Order: If this is enabled and a work order has a configured "Quoted Hours', the hours quoted will display to the technician within the work order details.
- Show Quoted Hours Warning to Technician: If this is enabled and a work order has a configured "Quoted Hours, when the labor hours equals the Show Warning When Labor Hours at X% of Total Quoted Hours is met, this "Quoted Hours" field within the work order details will be highlighted in yellow.
-
TIP: Enable this option only if you do not want to display the number of quoted hours to the technician, but want to give visibility that the quoted hours are Under (not highlighted), Approaching (Highlighted in Orange), or Over (Highlighted in Red). For example, if this feature was the only one that was enabled the technician would not see the quoted hours in parentheses (i.e., 7).
-

Customer Payment Terms/PO
If in Admin>Customer>Customer Details, a customer has 'PO Required' enabled then this field will be required before the technician can continue to the technician review. As well as, if the Customer has a Payment Term that matches what is set in Company Settings>Customer Settings>Billing Settings>Payment Terms to Highlight and Acknowledge, then the Payment Terms will display and will be highlighted in red.
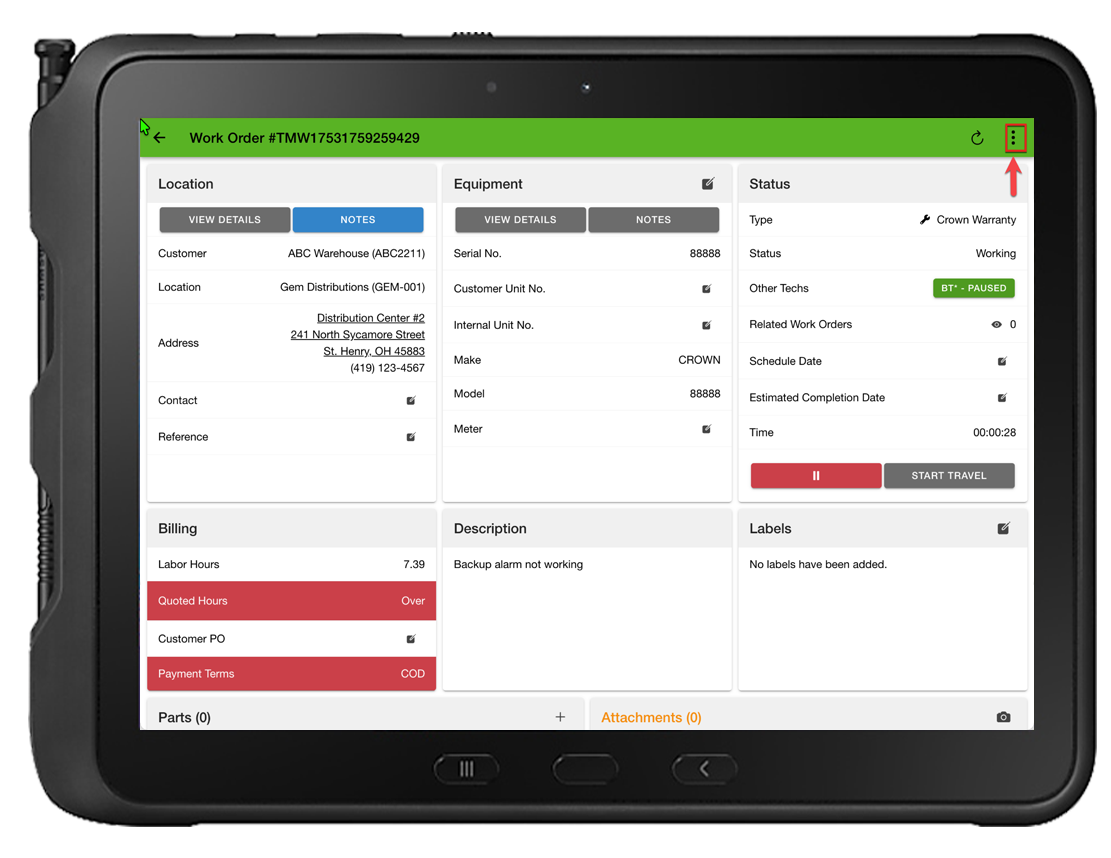
Work Performed Notes
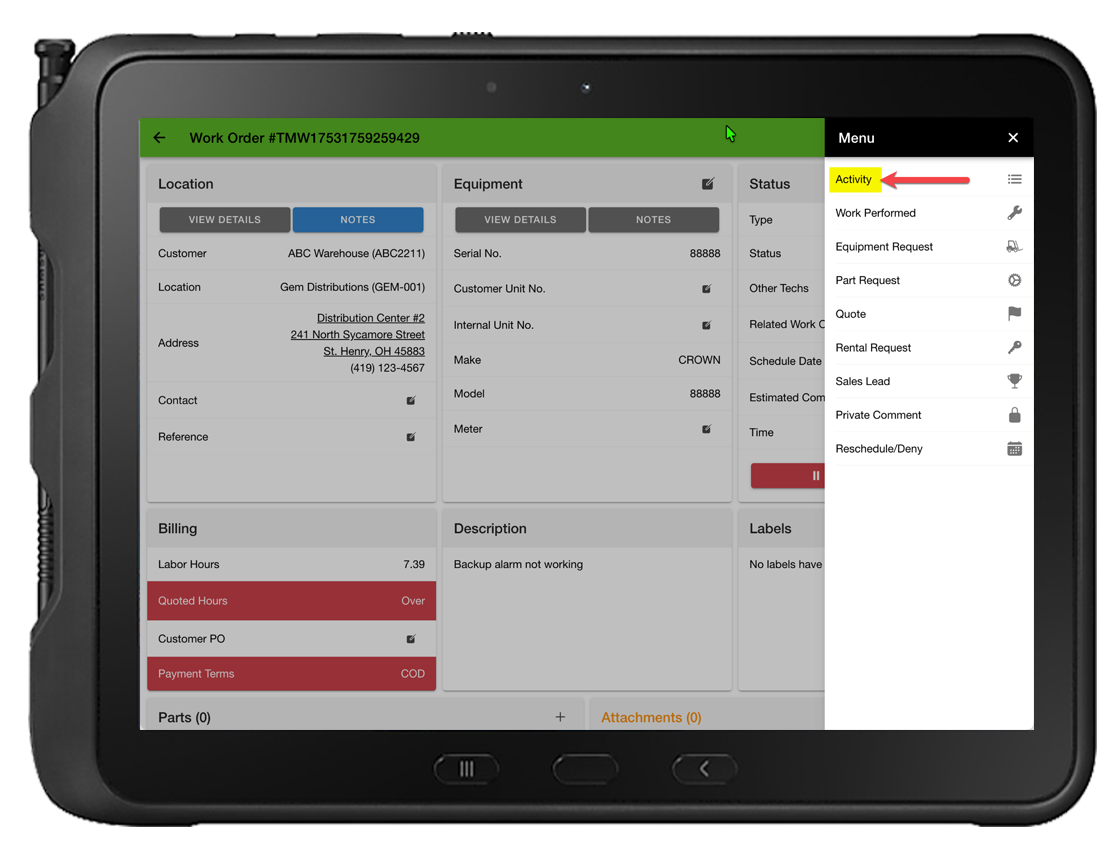
Work Performed can be added by the technician(s) and depending on the work order type settings, they may be required. To add work the work performed notes, click the three dots at top, right corner then select Work Performed. One to many notes can be added and are date/time stamped at the time of creation with the technician's name to help tell the 'story' of what was done when and by whom. TIP: Technicians can view, edit, and/or delete already added work performed notes that they have added by going into 'Activity' within the three dots.
TIP: Work orders can be refreshed to get the most up to date information on the tablet, to refresh the work order, tap on the “Refresh’ button in the top, right corner.

Once the required fields have been added and the repair/PM is completed, the Technician Review can be completed. NOTE: Upon completion of the technician review, the tech is automatically taken into the Customer Review, which consists of three options:
- Sign Now - This option directs technicians straight to the customer review screen, facilitating on-the-spot customer signature.
- Sign Later - Opting for this choice transitions the work order into customer review status. This flexibility enables subsequent signature capture at a convenient time, streamlining the process for 'bulk signing' multiple work orders if necessary.
- Cannot Get Signature - This option leaves the work order in Customer Review, prompting the back-office that they could not get a signature and is needed.
- Sign as Me - This avenue allows technicians to finalize the work order without necessitating a signature. The signature on the completed work order will prominently feature the name of the logged-in technician's first and last name. NOTE: If the Customer's setting is set to 'Require Signature', this option will not be visible to the technician.
TIP: Technicians can do a batch signature of work orders, one signature for all work orders completed. Click here to learn more.

Activity
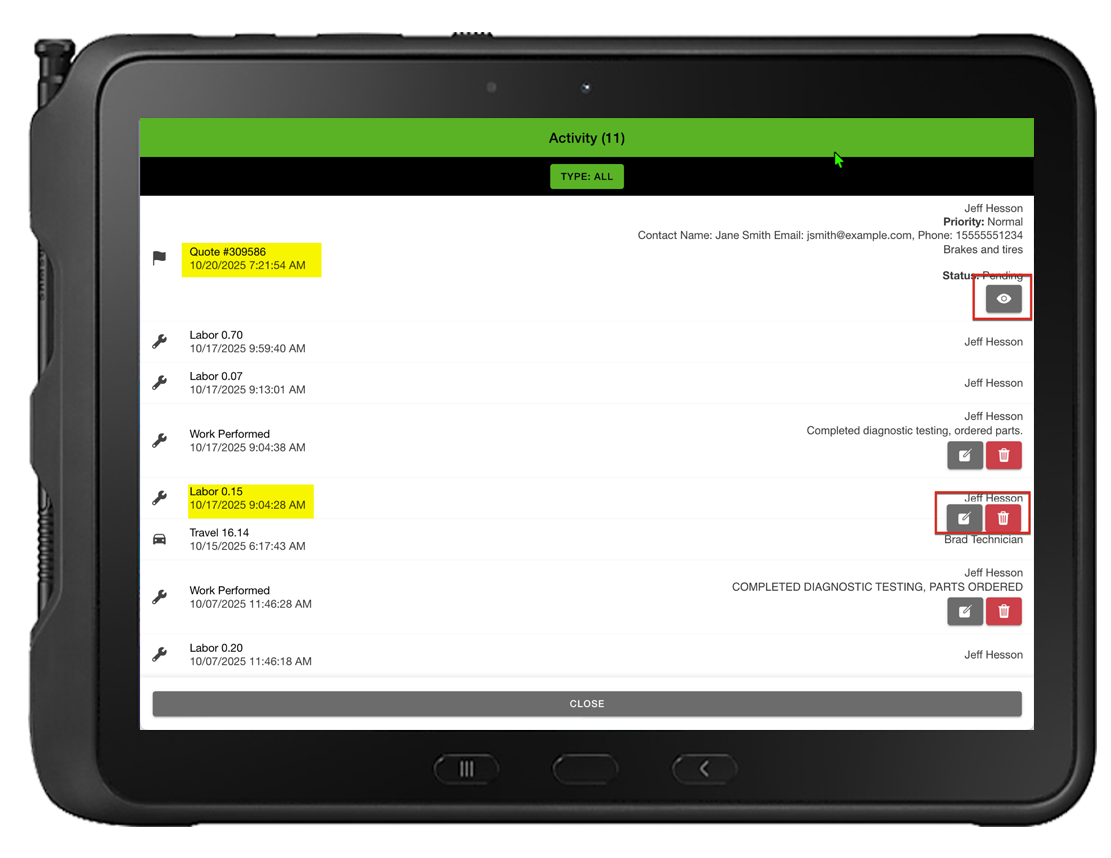
The 'Activity' option provides technicians with a comprehensive, real-time log of everything happening on a work order.
Technicians can easily view all completed actions, including submitted quotes, part requests, applied labor/travel hours, work performed notes, etc. More importantly, the Activity screen is where technicians can take action:
- Add or edit their Work Performed Notes.
- Comment on submitted part requests, quotes, or rental requests.
- Edit their applied labor and/or travel times (if their account has the necessary permissions).
-
In the work order details screen, press the three dots.
Press Activity.
The work order features a real-time log that provides technicians with a full history of all activity.
This activity log also serves as the control center for immediate updates:
- To add a comment to any submitted request (like a quote or part request), simply press the 'eye' icon.
-
If they have the permissions, technicians can edit their applied labor or travel time by using the pencil icon or delete the entry using the trash can icon.